Tensorflow-EfficientnetでGradCAMを実装してみた
前々から気になってたGrad-CAMを実装してみました。実装に当たって以下を参考としてます。
EfficientNet-Keras-GradCam-Visualization/inference_example.ipynb at master · lvisdd/EfficientNet-Keras-GradCam-Visualization · GitHub
上記は訓練済みのEfficientnetモデルをそのまま使っているのですが、この記事ではFinetuneもしてみました。Efficientnetは以下を使用しています。
GitHub - qubvel/efficientnet: Implementation of EfficientNet model. Keras and TensorFlow Keras.
1.個人的に引っかかったポイント
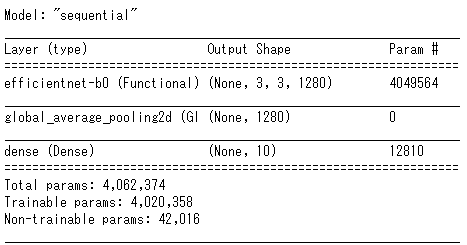
私はよく以下のようにEfficientnetのモデルを作成するのですが、以下の方法だとGrad-CAMで最終レイヤーを取得できず失敗するようです。
from efficientnet.tfkeras import EfficientNetB0

model = Sequential()
model.add(EfficientNetB0(
    include_top=False,
    weights='imagenet',
    input_shape=input_shape))
model.add(GlobalAveragePooling2D())
model.add(Dense(num_classes, activation="softmax"))
上記でモデルを作成して、model.summary()を実行すると以下の通りとなります。efficientnet-b0レイヤーとしてまとまってしまうのが問題なんだと思います
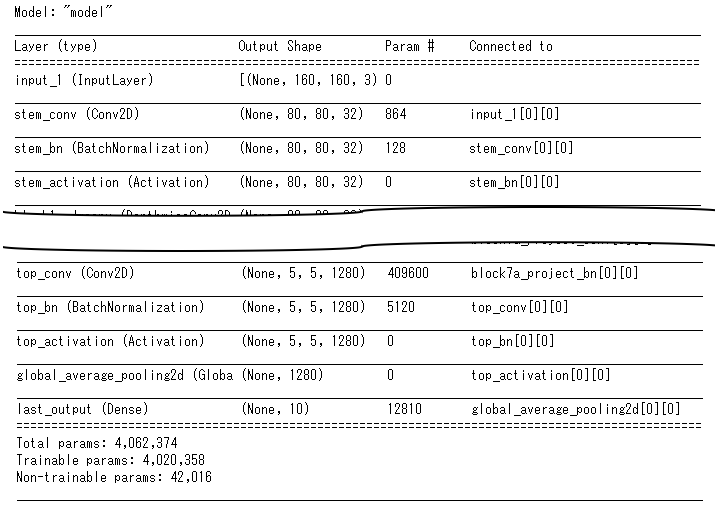
代わりに以下の通りモデルを作成することでうまくいきました。
from efficientnet.tfkeras import EfficientNetB0

eff = EfficientNetB0(
    include_top=False,
    weights='imagenet',
    input_shape=input_shape)
x = tf.keras.layers.GlobalAveragePooling2D()(eff.output)
output = tf.keras.layers.Dense(num_classes, activation='softmax', name='last_output')(x)
model = tf.keras.Model(inputs=eff.inputs, outputs=output, name='model')
model.summary()の実行結果は以下の通りです。長いので途中省略してますが、要は上記でモデルを作成すると、Efficientnet内部のレイヤーが残るようです。
2.Grad-CAMの実装
先述の通り、Grad-CAMの実装に当たってはこちらを参考としていますが、参考サイトではKerasを使用しており、Tensorflow.Kerasを使用している場合、エラーとなるので、多少修正しました。最終版は以下の通りです。tensorflow==2.3.0では問題なく動きました。
# grad cam関数
def grad_cam(input_model, image, cls, layer_name):
    """GradCAM method for visualizing input saliency."""
    y_c = input_model.output[0, cls]
    conv_output = input_model.get_layer(layer_name).output
    g = tf.Graph()
    with g.as_default():
        grads = tf.gradients(y_c, conv_output)[0]
    # Normalize if necessary
    # grads = normalize(grads)
    gradient_function = K.function([input_model.input], [conv_output, grads])

    output, grads_val = gradient_function([image])
    output, grads_val = output[0, :], grads_val[0, :, :, :]

    weights = np.mean(grads_val, axis=(0, 1))
    cam = np.dot(output, weights)

    # Process CAM
    cam = cv2.resize(cam, (image_size, image_size), cv2.INTER_LINEAR)
    cam = np.maximum(cam, 0)
    cam = cam / cam.max()
    return cam
3.CIFAR10で試してみた
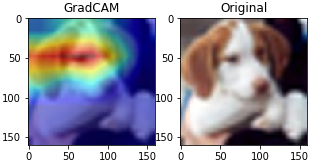
EfficientnetのモデルをCIFAR10でFinetuneし、Grad-CAMを適用してみました。結果は以下の通りです。無事、注視範囲の可視化に成功しました。目と耳に反応しているんですかね?
参考:ソースコード全文
データセット:CIFAR10
使用モデル:Efficientnet-v1-b0
#ライブラリインポート
import tensorflow as tf
import numpy as np
import pandas as pd
import matplotlib.pyplot as plt

from tensorflow.keras.models import Sequential
from tensorflow.keras.layers import Dense, GlobalAveragePooling2D, Flatten

from tensorflow.keras.utils import to_categorical
from tensorflow.keras.preprocessing.image import ImageDataGenerator

from efficientnet.tfkeras import EfficientNetB0
from tensorflow.keras import optimizers
from tensorflow.keras.callbacks import ReduceLROnPlateau, EarlyStopping

from sklearn.model_selection import train_test_split
from tensorflow.keras.datasets import cifar10

import datetime

from tensorflow.keras import backend as K
import cv2

# 画像をリサイズ(拡大)する関数を定義
def upscale(image):
    size = len(image)
    data_upscaled = np.zeros((size, RESIZE_TO, RESIZE_TO, 3,))
    for i in range(len(image)):
        data_upscaled[i] = cv2.resize(image[i], dsize=(RESIZE_TO, RESIZE_TO), interpolation=cv2.INTER_CUBIC)
    image = np.array(data_upscaled, dtype='uint8')

    return image

# データインポート
(x_train, y_train), (x_test, y_test) = cifar10.load_data()

# 画像リサイズ
IMAGE_SIZE  = 32
RESIZE_TO   = 160
x_train = upscale(x_train)
x_test  = upscale(x_test)

# 変数定義
image_size = RESIZE_TO
input_shape=(image_size,image_size,3)

# 予測するクラスの数
num_classes = 10

# モデル定義
def build_model():
    eff = EfficientNetB0(
        include_top=False,
        weights='imagenet',
        input_shape=input_shape)
    x = tf.keras.layers.GlobalAveragePooling2D()(eff.output)
    output = tf.keras.layers.Dense(num_classes, activation='softmax', name='last_output')(x)
    model = tf.keras.Model(inputs=eff.inputs, outputs=output, name='model')

    model.compile(optimizer=optimizers.Adam(learning_rate=1e-4), loss="categorical_crossentropy", metrics=["accuracy"])

    return model

# 訓練用関数の定義
def train_model(X, y, epochs, batch_size, callbacks):
    # 訓練データと評価データの分割
    X_train, X_valid, y_train, y_valid = train_test_split(X, y, test_size=0.2, stratify=y, shuffle=True)
    y_train = to_categorical(y_train)
    y_valid = to_categorical(y_valid)

    # Data Augumentation
    datagen = ImageDataGenerator(
        rotation_range=20,
        horizontal_flip=True,
        width_shift_range=0.2,
        zoom_range=0.2,
    )

    #モデル構築
    model = build_model()

    # 学習
    model.fit(
        datagen.flow(X_train, y_train, batch_size=batch_size),
        validation_data=(X_valid, y_valid),
        steps_per_epoch=len(X_train) / batch_size,
        epochs=epochs,
        callbacks=callbacks,
        shuffle=True
    )

    return model

# 訓練実施
epochs = 3
batch_size = 32

reduce_lr = ReduceLROnPlateau(
    monitor='val_accuracy',
    factor=0.2,
    patience=1,
    verbose=1,
    min_delta=1e-4,
    min_lr=1e-6,
    mode='max'
)
earlystopping = EarlyStopping(
    monitor='val_accuracy',
    min_delta=1e-4,
    patience=2,
    mode='max',
    verbose=1
)

callbacks = [earlystopping, reduce_lr]

print('開始時間:',datetime.datetime.now())
model = train_model(x_train, y_train, epochs, batch_size, callbacks)
print('終了時間:',datetime.datetime.now())

# 予測
preds = []
X = x_test
pred = model.predict(X)

# 予測結果の確認
df_pred = pd.DataFrame(pred)
pred = np.array(df_pred.idxmax(axis=1))
df_pred = pd.DataFrame(pred)
df_y = pd.DataFrame(y_test)
df_result = pd.concat([df_y, df_pred], axis=1, join_axes=[df_y.index])
df_result.columns = ['y','pred']

from sklearn.metrics import accuracy_score, precision_score, recall_score, f1_score, confusion_matrix
print('Confusion Matrix:')
print(confusion_matrix(df_result['y'],df_result['pred']))
print()
print('Accuracy :{:.4f}'.format(accuracy_score(df_result['y'],df_result['pred'])))
print('Precision:{:.4f}'.format(precision_score(df_result['y'],df_result['pred'],average='macro')))
print('Recall   :{:.4f}'.format(recall_score(df_result['y'],df_result['pred'],average='macro')))
print('F_score  :{:.4f}'.format(f1_score(df_result['y'],df_result['pred'],average='macro')))

# grad cam関数
def grad_cam(input_model, image, cls, layer_name):
    """GradCAM method for visualizing input saliency."""
    y_c = input_model.output[0, cls]
    conv_output = input_model.get_layer(layer_name).output
    g = tf.Graph()
    with g.as_default():
        grads = tf.gradients(y_c, conv_output)[0]
    # Normalize if necessary
    # grads = normalize(grads)
    gradient_function = K.function([input_model.input], [conv_output, grads])

    output, grads_val = gradient_function([image])
    output, grads_val = output[0, :], grads_val[0, :, :, :]

    weights = np.mean(grads_val, axis=(0, 1))
    cam = np.dot(output, weights)

    # Process CAM
    cam = cv2.resize(cam, (image_size, image_size), cv2.INTER_LINEAR)
    cam = np.maximum(cam, 0)
    cam = cam / cam.max()
    return cam

# modelの確認
model.summary()

# cifar10 class labels
labels = {
    0:"airplane",
    1:"automobile",
    2:"bird",
    3:"cat",
    4:"deer",
    5:"dog",
    6:"frog",
    7:"horse",
    8:"ship",
    9:"truck"
}

# grad cam
n = 16 #n番目の画像に対してGradCAM適用する
preprocessed_input = x_test[n:n+1].copy()
predictions = model.predict(preprocessed_input)
cls = np.argmax(predictions)
layer_name='top_activation'

gradcam = grad_cam(model, preprocessed_input, cls, layer_name)

# visualise grad cam
print("TRUE : {}".format(labels[y_test[n,0]]))
print("PRED : {}".format(labels[cls]))
for i in range(num_classes):
    print("  {:<10s} : {:5.2f}%".format(labels[i],predictions[0,i]*100))

plt.figure(figsize=(5, 5))
plt.subplot(121)
plt.title('GradCAM')
plt.imshow(preprocessed_input[0])
plt.imshow(gradcam, cmap='jet', alpha=0.5)

plt.subplot(122)
plt.title('Original')
plt.imshow(preprocessed_input[0])

plt.show()